ShareThis

ShareThis

Related Posts Widget for Blogs by LinkWithin

NOTICE!!!!!

I have moved my blog to craftpassion.com,
please go there for updated post. I am no longer posting my blog
here.


Showing posts with label Purse. Show all posts

May 10, 2009

Crochetted Daisy Coin Purse

Just can't get enough of making this sweet daisies. The crochet hooks are like a magnet pulling my hands!!! I made this purse to match the tote bag but this time I used single strand yarn. By using single strand the daisy is smaller and about half the size of the one on the tote.

My mind is going to explode! I have the desire to write down the pattern of the basic purse. I have never done any pattern authoring before, this is my first trial. Please just be patient with me, I will need time to write, test to come up with a foolproof one to ensure that the pattern won't bring you to never, never-land :p


I am not going to write the daisy pattern at this point of time, it is too difficult for me to write as I am just a beginner. It is complicated because it needs extra yarn at the outline to form the petals. You can always replace it with something else, like brooch for example, any brooch you like, just hook it on :)

By the way, the ball clasp frame I used is 8.5cm wide black-gold plated, sewable type. I like sewable frames, they tend to be more lasting then those glue adhered ---- they can withstand hand wash when they get dirty. Not only this, you can reuse it to make into another purse for whatever reason; get bored with the original purse, purse torn beyond usage. All you need to do is just remove it from the existing purse and sew on a new one :) Another recycling exercise! You can refer to my tutorial on "sewing a frame clutch purse" on how to sew the frame, you will find it at the end of the post as sewing the frame is always the last procedure.

This purse measured : 10cm W x 9.5cm H, about the same size as my previous stripe coin purse. Enough to put a lipstick, a small mirror, some credit cards and some cash.

Continue Reading...

May 3, 2009

It's A Pear, It's A Purse, It's A Pear-Shaped Purse


I finally finished this project - a pear-shaped frame clutch purse. If you have been following my blog, you probably know that I got this pear fabric from Lollychops. She sent me this fabric to make a frame clutch purse out of it. I made it and used up all the fabric!!!! I love this fabric and I am going to check with Lollychops if Spoonflower still have it :)
From paper modelling to sewing up and completing it took me 4 nights to accomplish. At the beginning, I designed a paper pattern with a big bottom just like the pear shown in the fabric but it looked very weird. Not only did it look funny but the lumpy bottom really made the purse unable to support itself to stand up straight. So, I trimmed it down to a "well-balanced" form and it looks perfectly normal now :). I also added a stem and a leave to mimic the pear look.
The purse measures a size 11.5cmW x 15cm H, enough to accomodate some cash, cosmatics and even a small mobile phone.

As usual, my beautifully hand emroidered label is in there :))
Only one??? No no no, I made another one, a simple one from the left-over fabric. This one is a quick one, within a day to produce.
Which one do you like the most? A real-looking pear purse or the simple one?


Continue Reading...

Apr 11, 2009

Crocheted Stripe Coin Purse

Since I have some left over yarn from the daisy I made for my tote bag, I made a coin purse to go with it. This is my first trial in making a frame-clutch coin purse with crocheted yarn. Not bad huh!

I am going to make more of this as I find it not as difficult as I thought, except the sewing part to attach the metal frame clutch onto the purse.
Recently I was struggling with this issue: "should I make some crafts for sale?".... You know, economy is bad and my hobby has become a luxury expenditure in the household. I know I have to do something to get my hobby going without burdening the family. One thing I can think of is to sell some of my handmade creations and generate some income to fund my next project and so on.... But, it saddens me that I am commercialising my craftwork. What do you think, should I?

Continue Reading...

Apr 9, 2009

My Melody Sling Purse

Easter is approaching... I made this for my 6 year-old daughter. She chose this "My Melody" bunny and asked me to make it into a purse for her, what a coincidence!!!

I addded a pot of lovely flowers beside "My Melody" and she requested that I put more lace flowers on top of them. Together we made this sling purse, especially to my princess...


To go with the sling purse, I will let her wear this on Easter day, a smock dress made by my amazingly skilled sister. Everybody will be drooling to see her wear these handmade garments and envy her so much. Most importantly, she is happy and hope she will keep all handmades in good conditions :)

Continue Reading...

Mar 11, 2009

KeroKeroPi Purse

This is the purse I finished off few days ago. It is supposed to be my friend's birthday gift but I ended up not being able to complete it in time. By the time she receives it, it will be a "belated bithday gift". Well, never too late to show the love to your friends, better be late than nothing..... Hope she don't mind :p Frankly speaking, I don't have many friends from so long ago. This friendship with this birthday girl is 15 years old. I especially cherish this friendship now because we are so far apart. She is residing in Hong Kong and I am in Malaysia. By the way, we met in UK during our studies and on first sight, I knew that she is a kind hearted girl, so adorable and helpful.We have so many pleasant memories to share though we only lived together for a year, yeah living in the same hostel, don't get me wrong. She was extremely crazy about Kerokeropi, so much so that she had a collection of them. I gave her a KeroKeoPi T-shirt many years ago as her birthday gift, now, KeroKeropi purse and it is my handmade piece especially for her.I hope she will like it!!!!

Continue Reading...

Mar 2, 2009

Monkey Frame Clutch Purse - Tutorial

In my previous post, I showed you how to felt the monkey called Chi-Chai Monchan. This time, this tutorial is going to show you how to make the Monkey Frame Clutch purse that I made for my friend as a thank you gift. You don't need a sewing machine to do it, just your hand, a needle and thread!!!
Material:
1. Exterior fabric for A pattern, 2 pcs.
2. Exterior fabric for B pattern, 2 pcs.
3. Inter-lining fabric for A & B pattern, 2 pcs.each
4. Poly-sponge for A & B pattern, 2 pcs each
5. Iron-on interfacing for A & B pattern, 2 pcs. each
6. 8.5cm wide frame clutch (口金), 1 pc.
Finished product Dimension: Approx. 10.5cm W x 9.5cm H x 6.5cm D

Cut out the fabrics as per pattern shown above.
Iron on the interfacing by sandwiching the poly-sponge in between for pattern A & B respectively.Sew on Chi-Chai Monchan felt onto the right side of exterior fabric A (click here for the tutorial of making the Chi-Chai Monchan Felting). Embroider "Chi-Chai Monchan ♥ Bananas" onto another piece of fabric A.Tack stitching pink colour thread onto fabric B with about 2mm spacing for each stitch and 10mm width apart for each line. Prepare the slip pocket. I sew on my label onto it :)
Sew the slip pocket onto the inter-lining as shown.
Join fabric A & B by back-stitch A-B-A-B as shown, then complete it by stitching it to A again. Be careful on the bottom tip, just sew until the tip end, please don't go beyond that point.
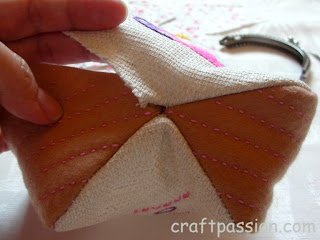
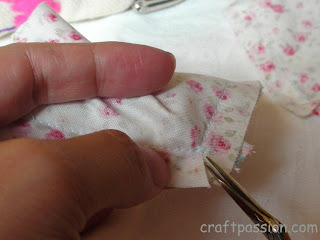
This is the picture of how the bottom is supposed to look like before completing the joining. Clip curve near to the sticthing line (please don't cut the stitches) at the space of 1 cm as shown. This is neccessary to have a nice curvature at the corner of the purse. The wrong side should look like picture shown below.Flip it over and it should look like this.Repeat the above steps to the inter-lining. Iron the joint seams.
Again, the bottom of the 4-piece-joint should look like this.
Now, we have finished both interior and exterior pieces.
Turn the inter-lining (2) to the wrong side.
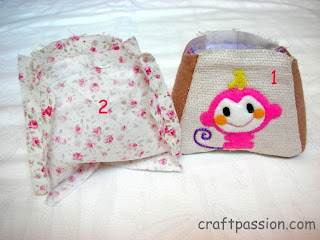
Insert (1) into (2).
Sew the upper portion by back-stitch.
Reserve half of the border unstitched. We are going to use this unstitched portion to gain access to turn the purse inside-out.
Pull out the exterior face from the unstitch gap.
Smooth out the inter-lining into the purse.Stitch up the unstitch portion to close the gap.

Tack-stitch the peripheral and get ready for the sewing the frame onto it.
Mark the centre line by water-erasable pen.
Stitch the frame with back-stitch, begin from the centre line. I used 4 strands of nylon thread to reduce the chances of thread breakage.

Complete!!!!

Continue Reading...

Feb 27, 2009

Monkey Frame Clutch Purse


Finally, I made it.... specially for my friend Sumay. I purposely delayed this posting as I wanted to surprise her by not letting her see how the purse actually looked like. I even asked her not to peek my blog on the felting part too until she receive the parcel. I sent it out yesterday and she received today :)) Her reaction was "I am not going to use it as it is too precious, I will keep it as a souvenir. I am going to be devastated if I lost it or dirted it". Oh, how sweet she is...

This one took me little while to finish as I spent time to photograph each and every step I did. It is going to be shown on my step-by-step tutorial for frame clutch purses and is going to take some time to edit and rearrange. I will post it up as soon as I finish editing it, please be patient :)

Continue Reading...

Feb 25, 2009

Tutorial - Felting on "Chi Chai Monchan"

This is the monkey, Chi Chai Monchan that I planned to made as part of the frame clutch purse to my friend, Sumay.
I would like to show you the process to make one, hope you will try it out too.

Colour selection of the felt material.
Making cardboard stamplates for each part of the body.
Cut out the required shapes and sizes as shown below according to the felt colour you chose. Sew the cheek to the face. Mark the eyes and mouth with water based erasable pen (the ink will disappear with contact in water). Then sew the face to the body.

Fill in the polyfill to add more dimension to the face.
Complete sewing the face.
This is how it looks after completing the face. Embroider the eyes with black thread and the mouth with pink. Again, embroider it after stuffing with polyfill will add some depth for the features.
Now, you can sew the body to the fabric surface you want to complete the felt project.

Continue Reading...

Feb 7, 2009

Manek Purse & Shoes

I made a frame clutch purse to go with the kasut manek I did weeks ago.

The time I took to complete this purse was greater than the shoes. It took me about 3 weeks to complete it. Just imagine sewing tiny beads one by one to the cross-sticth canvas, and there are thousands of them.
In order to make the purse look more girlie, I added some yo-yo flowers onto it. The yo-yo flowers are made by using Clover quick Yo-yo flower maker. These Yo-yo flowers are easy to make, just follow the instructions which come with the tool. Basically it consists of two pieces of plastic parts, a tray and a disc. Fit the disc into the tray, sandwiching a piece of fabric between the two pieces. Sew according to the instruction, remove the tray and disc, pull the string and gather up the fabric to form a flower, tie the string and stitch into the bag. That's it, pretty easy to make a beautiful flower in just a couple of minutes. May be I should demostrate it in my future tutorial section. The method to make the leaf is even easier than the flower, just fold a round piece of fabric into quarter fold and stitch the end side of it, pull the string and gather the fabric, taadaa... a leaf is formed.
Upon finishing all parts for the purse, it is time to join them up to assmble a cute purse. I did mention the method to make a Frame Clutch Handbag in my previous post, please click here to go there.
I hope the instructions aren't too confusing. Please leave some comments and questions should you have any, I would love to share as much as possible. I hope I have inspired my readers to get into crafting!!!

Continue Reading...

Jan 16, 2009

Fish Frame Clutch Purse

I think little girls will like this one, even I can't take my hands off it ha ha ha... If you wish to have one, please let me know.
This is a little time-consuming to do as I have to sew more then usual.
Even though I have to use contrasting fabrics, I still have to use complementing prints otherwise it would look too weird!!!
In my previous post I mentioned how to make frame clutch handbags, the method of making the purse is similar. May be you need to hand sew a little more in purses as the pieces are smaller in comparison.

Continue Reading...
www.flickr.com

  © Blogger templates The Professional Template by Ourblogtemplates.com 2008

Back to TOP