ShareThis

ShareThis

Related Posts Widget for Blogs by LinkWithin

NOTICE!!!!!

I have moved my blog to craftpassion.com,
please go there for updated post. I am no longer posting my blog
here.


Jan 16, 2009

Fish Frame Clutch Purse

I think little girls will like this one, even I can't take my hands off it ha ha ha... If you wish to have one, please let me know.
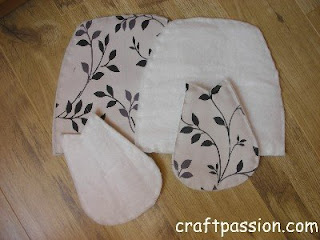
This is a little time-consuming to do as I have to sew more then usual.
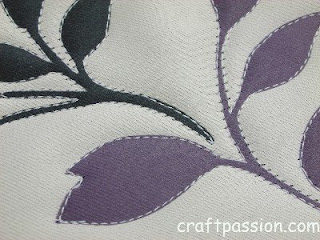
Even though I have to use contrasting fabrics, I still have to use complementing prints otherwise it would look too weird!!!
In my previous post I mentioned how to make frame clutch handbags, the method of making the purse is similar. May be you need to hand sew a little more in purses as the pieces are smaller in comparison.

Continue Reading...

Jan 13, 2009

Garden Frame Clutch Purse

This is another clutch purse I completed. The size is slightly smaller than the flower type, approximately 3"W x 2.5"H x 1.5"D.
It is like my dream garden, with beautiful flowers and a lady bird flying around. It evokes memories of a peaceful slow paced day with cool breezes blowing . Where in the world has such memories gone? I hope to find it back soon.

Continue Reading...

Jan 12, 2009

Flower Frame Clutch Purse

I am now addicted to making frame clutch purses. Each and everytime whenever I have some spare time, my hands will just open up the sewing box and continue what I did last. While doing it, my brain will think of what pattern I want to do next, oh.... I am so crazy about it.

My passion for the frame clutch purse is linked to my childhood memories. I remember when my mum would bring me to the wet market, she will carry a small clutch purse where she keeps her money in. With one hand holding my small little hand and the other hand holding her purse. The money in that little purse is going to buy us food that last only for days. In order to get more food with that little money, my mum will negotiate over and over again to make sure that she will have the best price for them.
The one shown above is about 5"W x 4"H x 2"D in dimension which is ideal to keep coins and small change. I am doing another one and is about to complete. Will post up here soon, so please hang on.

Continue Reading...

Jan 8, 2009

Kasut Manek (Beaded Shoes)

Finally, I finished my second pair of Kasut Manek. It has been the most eye-straining project I have done. Average people take about 2 weeks, even months to complete but I took about 12 days (working throughtout day and night). I did my first pair about 9 years ago for my wedding, unfortunately it was stolen during a break-in.
The manek or beads I used is Size 15 Japanese Seedbeads. I used 7 colours: white, sliverlined blue, yellow, sliverlined yellow, opaque green, opaque chartreuse and black. There are manek shoes made from bigger beads, size 11 but personally I prefer the smaller size as it makes the pattern look finer and better.
First of all, clamp a 16-count cross-stitch cloth onto a rectangular frame, trace an outline of the shoes cover of the pattern and size you want (I got it from the shoes-maker who is going to do the final part of the shoes). Start of with sewing the top and bottom outline (blue colour beads in my picture shown below). Next, start sewing the beads from the center of the pattern. The bead should be sewn in diagonal direction on a square of the cross-stitch cloth. Pick one bead into the needle for every square you sew.

Upon finishing, you can give your manek shoes cover (shown above) to your shoes-maker to attach the sole and heel in order to complete the kasut manek. Choose the colour you prefer for the sole and heel. I used blue for the sole and white for the heel. The shoes-maker will need to measure your foot in order to perfectly fit your feet. If you can't present yourself there, you can trace your foot outline on a paper and measure the width of the widest part across the upper arch of your feet. Some shoes-makers will want you to come again to fit the shoes before he nails and fixes it permanently.

Continue Reading...

Jan 5, 2009

Handmade Frame Clutch Handbag - The Making Of

I am most delighted to share with you how to make the frame clutch handbag I posted since most of you ask me how to make it. It is not difficult but needs some patience and sewing skills. I did it with my normal household sewing machine and spent about a week on it.
First, choose the fabric you want to make, I prefer to use canvas or furniture fabric as they are thicker and firmer. Cut the fabric according to the shapes and sizes.
Attach the poly-sponge to the wrong side of the fabric. The sponge is needed to make the handbag look soft and puffy, I also used it for the applique quilting effect of the fabric.

Sew the outline of the printed patterns of the fabric together with the attached sponge.
This is how it looks after sewing it.
Sew the bottom part of the 2 largest pieces of the fabric, then sew the 2 smaller pieces plus a rim onto it. I used sewing machine's leather belt as the filling of the rim as it helps to make the handbag self-sustaining.

Cut the interior lining fabric exactly the shape and size of the exterior fabric, sew them up but this time without the rim. Add pockets if you want, I made 1 zip pocket and 2 slip pockets for it.
Lay the interior lining into the handbag. Lastly, assemble and sew the frame onto the upper part of the handbag, that's it....

Continue Reading...

Jan 2, 2009

Handmade Frame Clutch Handbag

Recently, I got into the mood of challenging myself to make a handbag. I was inspired since buying a "frame clutch bag" how-to book from Taiwan. I was totally thrilled by how pretty the handbags and purses were while browsing through the book. How can I resist not making one! At least one.... ah ha... but this question arose. Where can I get the materials, especially the metal frame clutch with ball closure? After weeks of searching and asking around, I finally found them. Waited weeks for them to come in as they were stuck at the custom for clearance since the officer haven't seen it before and couldn't classify which catergory of the tarrif codes to tax me. After all the hoo-ha, they finally released the parcel to me without imposing any tax, lucky me :)

Continue Reading...
www.flickr.com

  © Blogger templates The Professional Template by Ourblogtemplates.com 2008

Back to TOP