ShareThis

ShareThis

Related Posts Widget for Blogs by LinkWithin

NOTICE!!!!!

I have moved my blog to craftpassion.com,
please go there for updated post. I am no longer posting my blog
here.


Jun 11, 2009

To All My Follower


I am back, after more than 2 weeks of full force in getting my blog migrated to a new blogging platform (Wordpress), finally back to my normal routine of blogging again. I missed posting and even feel guilty for keeping you all waiting. Finally, I am back in action again, together with the new layout, you will find my various crafts even easier than before.


Since I am no longer using blogspot platform, all my updated posts will not feed into your following list. Please re-link my blog http://www.craftpassion.com/ manually to your following list.

See you again in my new layout :)


Thank you.

p/s: this probably my last posting in blogspot.

Continue Reading...

May 22, 2009

Announcement

(Source: Canon Creative Park)

I will be having a major system upgrading taking place these few days. Yes, I am migrating my blog to another platform for better performance which in turn will make the surfing easier and more effecient. I made this because of you, my owesome readers.

In other words, I won't be posting during this period of time until I finished fine-tuning my new layout and get to work on the new platform.

If you notice my blog looks funny with misaligned header/side bar, or broken links, that means I am still working hard to tweak and tune it.

I will be back soon, till then, please enjoy reading my exisitng posts and tutorials.

Continue Reading...

May 19, 2009

Recycle Tutorial - Making Of T-Shirt Yarn

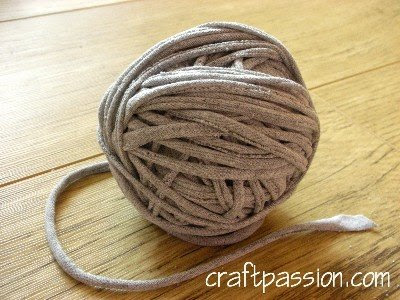
Another tutorial to help save our Mother Earth by turning unwanted items into something useful. This is the yarn ball I made out of an old T-shirt which I have been wearing for 10 years day-in day-out, wash-in wash-out. It finally broke down and tore at the collar and sleeves. Waste not, want not, I decided to recycle it.

In this tutorial, you will need:

1. T-shirt (those without side-seam)
2. A pair of sharp scissors

Place the T-shirt flat on the floor or working table.
We only need the bottom-halve portion of the T-shirt. Cut horizontally from sleeve to sleeve as shown above. Cut away the end border of the T-shirt too. This useful" portion must be plain and free from printing, embroidery and any joints or seams. Any motifs will be too hard for the T-shirt to turn into tubular yarn.

Fold the T-shirt from side to side, leaving an inch allowance as shown.

Cut into strips as shown, remember not to cut the 1 inch allowance. Leave it there as we are going to use this to form a continuous strip.
The width of the strip will determine the thickness of your yarn, but the minimum is 15mm, anything less than this, the process will fail. The width shown here is 15mm.

Finish cutting the T-shirt from top to bottom evenly.
Unfold the 1 inch allowance and it will look as shown below.
The next process is to make a slant cut from strip 1 to strip 2, strip 2 to strip 3 and so on in order to create a continuous strip for the whole T-shirt.
I purposely leave the first strip uncut until I have finished all. No catch, just my preference to show you better how the slanting looks like.
Now, I have a loooooooong strip of continuous T-shirt yarn waiting for the next process.
Next is to turn the strip into a tubular yarn. All you need to do is tug the strip as shown below. Rememeber I told you that the minimum width of the strip is 15mm? The secret is.... if you have anything narrower than this, it will break once you pull.
See, the strip will curl and form a tubular shape after the tug. This process will lengthen the yarn too, which is good, so you have more yarn to work on your project.


....tug....

....tug....

....tug....

The strip has now turned into tubular yarn, from Fettuccine to Spaghetti ***wink***. You can roll your yarn into ball and it is ready for your next project.

HAPPY YARNING!!!

A preview of what is coming up next!!!!

Continue Reading...

May 17, 2009

Amigurumi - Owl

The crochet hook is stuck on my hands. I crocheted this cute owl and made it into a key chain. This craft/art is called Amigurumi, which is the Japanese art of knitting or crocheting stuffed animals or other creatures. Again, to be friendly to Mother Earth, I used my left over yarns since this tiny creature doesn't require lots of yarn. This is the first one I made by following Roxycraft's "Woody The Owl" pattern, (it's free, go and get it here!).

It is quite easy to follow but I found that the instructions aren't very complete. A novice Amigurumi practitioner like me had lots of question marks floating around my head at certain steps like the placement of the eyes, the nose, the wings and the feet. Since I experimented with it, I am able to give more detailed instruction. I made 2 of them to compare and I am going to tell you where the ideal location is :)


1. EYES - The stem at the back of the eye should poke through between row 10 and 11, 8 stitches apart. Glue it or screw it, depend which type of eyes you have. I used the glued one, it is cheaper than the screwed one.
2. NOSE - It says "stitch to face with top edge 1 row above the eyes", it means top edge of the eye.
3. WINGS - It didn't say should I use right side with the flap curl-out or wrong side with the flap curl-in, so I used both to test out and I like the wrong side with the flap curl-in (as shown below). Sew it on on the position between row 7 & 8 and 3 stitches counting from the stem of the eye. Remember to tilt the wings so that the tip is at a slight angle pointing to the front of the owl.
4. FEET / CLAWS - It didn't say anything about it in the pattern but it was there, so I am going to tell you where. Start sewing the centre claw at row 14 and 2 stitches counting from the tip of the nose. Sew it down vertically to row 16. Make another 2 diagonal left and right claws 1 stitch away from the center. Do the same to the other foot.

This is the second one I made after testing out the first one. Both of them look a bit different and it is because of the difference in those positionings I mentioned above.


Try it out, this owl is just too lovely to resist :) If you have any questions, feel free to ask me, I would love to explain to you.

Continue Reading...

May 10, 2009

Crochetted Daisy Coin Purse

Just can't get enough of making this sweet daisies. The crochet hooks are like a magnet pulling my hands!!! I made this purse to match the tote bag but this time I used single strand yarn. By using single strand the daisy is smaller and about half the size of the one on the tote.

My mind is going to explode! I have the desire to write down the pattern of the basic purse. I have never done any pattern authoring before, this is my first trial. Please just be patient with me, I will need time to write, test to come up with a foolproof one to ensure that the pattern won't bring you to never, never-land :p


I am not going to write the daisy pattern at this point of time, it is too difficult for me to write as I am just a beginner. It is complicated because it needs extra yarn at the outline to form the petals. You can always replace it with something else, like brooch for example, any brooch you like, just hook it on :)

By the way, the ball clasp frame I used is 8.5cm wide black-gold plated, sewable type. I like sewable frames, they tend to be more lasting then those glue adhered ---- they can withstand hand wash when they get dirty. Not only this, you can reuse it to make into another purse for whatever reason; get bored with the original purse, purse torn beyond usage. All you need to do is just remove it from the existing purse and sew on a new one :) Another recycling exercise! You can refer to my tutorial on "sewing a frame clutch purse" on how to sew the frame, you will find it at the end of the post as sewing the frame is always the last procedure.

This purse measured : 10cm W x 9.5cm H, about the same size as my previous stripe coin purse. Enough to put a lipstick, a small mirror, some credit cards and some cash.

Continue Reading...

May 5, 2009

My First Apron - A Gift To A Fellow Blogger

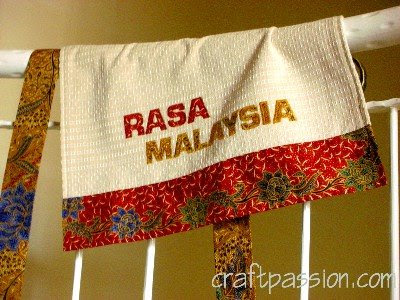
I made my first apron specially for my best friend Bee Yinn of Rasa Malaysia, who is also the owner/writer/chef/photographer of the famous food blog for Asian Recipes and Cooking. I always wanted to make something for her as thank you gift for inspiring me to blogabout my hobby! Without her encouragement, there wouldn't be Craft Passion. This saga began last year when she came back for holidays from California, she encouraged me to create a blog, knowing that I am passionate about handicraft, so that I can post up my craftworks to let the world see my creations.
I specially designed this apron for her after I saw the recent interview by a local newspaper Kwang Wah Daily about her food blog. I think she really needed an nice apron for the press exposure :)

I used a tea-towel-like fabric as the base material of the apron and ran a batik lining around it to create a Malaysian feel. I bought this handprinted batik fabric from Terengganu, a state on the east coast of Peninsular Malaysia. This apron is reversible, with Rasa Malaysia appliques on one side and plain appearance on the other side.

Besides using it as an apron, she can also fold it and use it as a table mat for her food photography.

Continue Reading...

May 3, 2009

It's A Pear, It's A Purse, It's A Pear-Shaped Purse


I finally finished this project - a pear-shaped frame clutch purse. If you have been following my blog, you probably know that I got this pear fabric from Lollychops. She sent me this fabric to make a frame clutch purse out of it. I made it and used up all the fabric!!!! I love this fabric and I am going to check with Lollychops if Spoonflower still have it :)
From paper modelling to sewing up and completing it took me 4 nights to accomplish. At the beginning, I designed a paper pattern with a big bottom just like the pear shown in the fabric but it looked very weird. Not only did it look funny but the lumpy bottom really made the purse unable to support itself to stand up straight. So, I trimmed it down to a "well-balanced" form and it looks perfectly normal now :). I also added a stem and a leave to mimic the pear look.
The purse measures a size 11.5cmW x 15cm H, enough to accomodate some cash, cosmatics and even a small mobile phone.

As usual, my beautifully hand emroidered label is in there :))
Only one??? No no no, I made another one, a simple one from the left-over fabric. This one is a quick one, within a day to produce.
Which one do you like the most? A real-looking pear purse or the simple one?


Continue Reading...

May 1, 2009

Billboard Mania!!!

(Billboard showing my Daisy Tote)

I was having fun with PhotoFunia to create these special imaging effects on my craftwork :) How nice if this is for real to have them on the large billboard to let the world see what I have created. What a greedy mind I have ha ha ha!!!!

(Window Display showing my Chi Chai Monchan Purse)

Well, we all have dreams, we work towards achieving them. Mine is that to let the world sees and appreciates my craftwork, so I am working very hard towards it. Hoping that this day will come soon :)


(Ads showing my Recycled Tote)


Have fun with PhotoFunia and create your dream today!
Coming up next: Pear-shaped frame clutch purse and many more.....

Continue Reading...

Apr 30, 2009

Lookie What I've Found From The Net

(Click to view larger photo)

Look!!! I found KnitPro 2.0 from a craft website, Microrevolt by using Stumble Upon. With KnitPro 2.0, it can quickly convert your photo to cross-stitch, needlepoint, crochet and knit patterns. I did it for my fishy purse with the largest grid size. It's easy as ABC, load your photo and click "submit", a .pdf document with your beautiful pattern will be generated in seconds.

Enjoy generating your own cross-stitch pattern by using KnitPro 2.0!!!! Please share with me if you found any other cool website with features to have more crafty fun with!!!
Click here if you don't have Adobe Acrobat to read .pdf file.

Continue Reading...

Apr 27, 2009

My Blog And Crafts Reviewed By CraftGossip!"

Recently two of my craftworks were featured in CraftGossip in Sewing Craft -"Lookie what she made". I was so surprised and practically fell off my chair when I saw it there.

CraftGossip covers news written by craft people telling you about all the good stuff. They scour the net looking for the best craft ideas and projects and review them for you.
My 100% Recycled Material Tote is the first one they wrote. Here is what CraftGossip had to say about it.

Fishy Frame Clucth Purseis the second one they chose to write about!

Craft Gossip also covering topics ranging from knitting, crochet, bath and body, jewelry making, scrapbooking, sewing crafts, recycled crafts, needlework, edible crafts, indie crafts, stamping, lesson plans, glass art, quilting, polymer clay and felting.

You will find something to inspire you there, have fun!!!!

Continue Reading...

Apr 18, 2009

Tote Bag Made From Recycled Material

See what I have made over the past few days.... a tote bag using all recycled material. This is what I called it TRULY Recycle bag!!!

Basically this tote is made from:
1.
Fused Grocery Platic Bag which I have shown you on my previous few posts. See the red patch with "Esprit" on it, I like this the most :))
2. My old soft jeans
3. My old but seldom used curtain, blue fabric with diamond-shaped print on it
4. Rice sack, the brown colour fabric. You can use potato sack or peanut sack to replace it.

One.....


Two..... Three!!!!

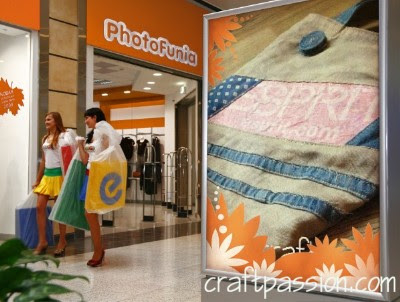
Three designs in one bag!!!! You have the choice to choose which design to go with, be it a "branded bag" with "Esprit" (one of my favourite fashion boutiques), or as a baby bag with a baby drawing as a pocket, or just a plain blue diamond printing bag... it is your preference for the day :))

Look at the stripes above, they are the foot ends of my jeans.

And, this litte rolling reel is made from the side seams of my jeans. Just roll it up and bond it with fabric glue, sew it on the bag by making a few decorative stitches at the centre of this seam reel. I was inspired by Polka Dot Pineapple when Lettie shown us how to make a coaster out of the seams of the jeans.

The amazing Fused Grocery Plastic Sheet that I have made has turned into something stylish. I have changed it's life from being just "grocery plastic bag" :p

Guess where did I get this baby picture from? And the alphabet on top of it "KEA"?
...
...
...
...
...
Mothercare and Ikea, got them right?

"This Tote Bag is specially dedicated to EARTH DAY, April 22....
Reduce, Reuse, Recycle please!!!!"

Continue Reading...

Apr 17, 2009

Fabrics, Fabrics, Fabrics, I Love Fabrics

I love fabrics!!! The above 3 pieces of fabrics are my recent gifts.

Left - from sumay, my lovely editor for this blog. This fabric material is popular in making saree, a tradition garment for female in Indian subcontinent. I plan to make a nice and elegant frame clutch purse with it. I like the tassel-like dangly bits on it and will definitely retain it on the purse. May be I will add some beads on it to make it more classy and elegant.

Middle - from Lollychops. She saw my fish frame clutch purse and thinks that I could use this fabric to make a pear-shaped frame clutch to match the printed pears on the fabric. Her eyes are so sharp to spot the body of that fishy purse to resemble a pear, without the lip and tail of course :)

Right - a swap with Joanne of Ready.Set.Craft . I love the flower prints on it, I plan to make something denoting Springy season with it. Could be a tote bag, but I'm not sure yet :p

I love these fabrics so much so that I have to properly plan my work to ensure that I wouldn't ruin them with bad designs :)

Continue Reading...

Apr 15, 2009

Orang Utan - The Endangered Species

There is an update from PlanetJune who made the cute little crochetted OrangUtan which I shared with you in my blog few days ago. Please click here to see the "behind the scene" making of her adorable OrangUtan. It is amazing when you see how this creature was created, it truely is a piece of art not a craft, as what PlanetJune described in her blog!!!!

(Aware: the following is nothing about craft but Orang Utans!!! )

(Photo courtesy of OrangUtan Outreach)

OrangUtan, the endangered species found mainly in the wild of Borneo, Malaysia and neighbouring country Sumatra, Indonesia, has been threatened to near-extinction caused by relentless devastation of their habitat to clear land for palm oil production and logging. I feel ashamed that this is happening here, and I am going to do something about it. I found this, an organisation to rescue and raise the awareness of the endangered OrangUtan, Orangutan Outreach. Orangutan Outreach is an affiliate of BOS International, with the main purpose to save and conserve OrangUtan in their native habitat, please click here to read more.

(photo from courtesy of OrangUtan Outreach)


Recently, there is a malaria outbreak in their Nyaru Menteng rehabilitation Center. It is very common occurence especially amongst the youngsters. This poor little toddler OrangUtan, "Angely" shown in the picture above is one of the victims who died recently. I was saddened reading this :(

Orangutan Outreach is calling out to the public for an emergency appeal for medicine for the OrangUtan in Nyaru Menteng rehabilitation Center. They need lots of money to get medicine to save and cure the infected OrangUtan. I plead you, my dearest readers to donate to the foundation. I did it and I hope that you could do the same to save the OrangUtan. I also proposed to PlanetJune that she makes some of the OrangUtans for sale to raise funds for it. I will buy from her if she does. Money collected from the donation will be used for medicine, food, equipment, rescue operations, cages and hundreds of other items that are necessary to rehabilitate the orangutans and keep the projects going.


This piece of news was published a couple of days ago of about 200 newly discovered Orangutan "nests" in Kalimantan:

Monday 13 April 2009


Up to 5,000 orangutans from an endangered species could be living in Borneo, scientists say, after the discovery of over 200 orangutan "nests" on the island. The news raises hope for the survival of what was thought to be a nearly extinct species.

Continue Reading...

Apr 14, 2009

Recycle Your Grocery Plastic Bag

Do you have the habit of keeping your grocery plastic bags? I do, and have plenty of them in my carbinet. I know that I will find good use for them one day instead of throwing them away into the dustbin and loading the landfill.
I emptied them out on the weekends as there were too many to keep. Looking at them and noticing that some plastic bags are so beautifully designed, it seems like such a wastes, so I made this!!! Fused plastic sheet for various crafts, you can even sew on them. At this point of time the outlook of the plastic sheet doesn't seems appealing to you but it will be a great art when you put them together with other material. I am going to use them to make a recycled tote bag!!!
Let me bring you to the tutorial on how to make these fused plastic sheets. I will keep the recycled tote bag for another post in few days time, so please come back and check for the updates.

Material

  1. a pair of scissors,
  2. 2 sheets of blank white paper,
  3. a thick towel,
  4. iron,
  5. plenty of thin grocery plastic bags, and
  6. a well ventilated room

Method
Cut the grocery plastic bags into flat rectangle sheet, i.e cut away the handles, the bottom and side seams. Stack 6-8 pieces of equal size together. The most top and bottom plastic sheet must be white and blank.

Sandwich 2 pieces of plain white paper in between the plastic pile. The paper must be bigger than the plastic so you won't iron and melt your plastic and stick on it.

Set the iron to medium heat and stroke across the plastic pile slowly and evenly. The heat from the iron will fuse the plastic sheets underneath. Remove the iron and press against the pile with a thick towel to let it cool down slowly. Please don't touch it as it is quite hot for your bare hand to handle it. As it cools, the plastic pile will harden and shrink a little, you will hear some creepping sound. If you skipped this step, your plastic pile will shrink and roll up while it cools, as a result, you won't get a flat plastic sheet.Take a closer look of how it looks after the fusing. See, they are bonded together!!!

You need to try out a few times to get the right temperature. The photo shown below was my failed trial. The reason being was that I set my iron temperature too high and the plastics were melted and formed holes. If you find that you plastics are not fusing, that means your iron is not hot enough, increase the temperature or stroke it longer.


If you have any questions, please do leave comments below and I will get back to you as soon as possible.
Good luck.

UPDATE *** I have used this fused plastic sheet combined with other material to make a tote bag.

Continue Reading...

Apr 12, 2009

Little Girl Vintage Crocheted Dress

My friend, Sumay went to her friend's house and found these to share. Below are the photos she snapped to show, two well preserved and nicely handicrafted crochet dress by her friend's mum 33 years ago.

++++++++++++++++++++++++++++++++++++++++++++++++++++++++++++


Hello this is Sumay here, Joanne's friend and a big fan of her blog. I was at my friend's house when I was telling her about Joanne's blog. Puan Rashidah took out her creations that she made for my friend, Effie, 33 years ago! Puan Rashidah at that time was a housewife residing in England so to kill time and of course dress up her cute daughter, she would crochet these wonderful little dresses that have withstood the test of time!!! From my observation, Puan Rashidah must have been the most patient crafter as I did not see any mistakes in them!!!

Thank you, Aunty for sharing this with us!!!

Continue Reading...
www.flickr.com

  © Blogger templates The Professional Template by Ourblogtemplates.com 2008

Back to TOP