


Fresh New Look Of My Tote Bag
Finally, after a week of hardwork on the face-lifting, my old tote bag has a fresh new look!!!!
Taa Daaaaa....
 A "Daisy Tote"!!!!
This takes a lot more than my original plan and why it took me so long to finish it :p. I was thinking of just crocheting a flower*** which I learned from an "Irish Crochet-Lace Book", sew onto it and sew a piece of simple internal lining with a zipped pocket.
***Remark: If you notice my blog header, you will see a picture of a similar white flower over there, that is the test piece I did monthssss ago.
 As I work on it, the internal lining get more and more elaborate. I want it to be my new born baby's daiper bag, the internal lining must look soft and comfortable, so I did some diagonal quilt sewings onto it with a piece of poly-fluffy....
 Then, I need something to hold the milk bottle or thermoflask upright so that it won't accidentally lay horizontal and cause liquids to leak out. If you experienced the leakage before you will know how messy it gets. I attached two elastic bands at the side of it to hold the bottles.
It is still not enough to be a diaper bag. What about the diapers and wet tissue? I want them to be in a proper place so that I can access them easily. Again, another strip of elastic band across the bag. I put a magnet button instead of dead stitching it for the elastic to hold the diaper and wet tissue independantly. In future, I can choose to accommodate wider things like books and don't have to take the stitches out. Flexible and adaptable to whatever occasion huh~
 This is how the internal looks like in flat before I sew them into the tote. Upper is my diaper bag arrangement and it can transform to other bag (bottom) one day when my baby grows up. I believe this tote can last for years :)
 As usual, I put my beautiful lable on the zipped pocket - "Handmade by Craftpassion" :)
 I brought it out this morning for my 6 month-old's vaccination jabs and got these reactions from the clinic assistants. Their eyes stared at my daisy tote the moment I walked in and their eyes were watching the tote where ever I walked. Before I left, one of the clinic assistants finally articulated her desire and asked me where I bought this tote and it is so beautiful.... haa haa haa I was so happy and felt like floating up to the sky and replied "Oh thanks, it is the only one in the world and it was made by me". Their eyes turned so big like they don't believe it and seconds later they asked if I am going to make another one and sell to them, I just gave them a smile and replied politely " I am afraid not! This is specially for my baby".... oh the gratification is undescribable!!!! Wonders of HANDMADE, no two pieces of works are identical and the admiration spurs me on to create more!


 The toughest part for the hexagon quilting is the fabric matching part. I sat in my craft room with my pile of fabrics around me ***matching matching matching***, half a day gone by and I still can't make up my mind which colour theme to choose. Finally I decided to have a green male turtle, this is how Greeny was created and got his name!
 He is so cute that I couldn't help myself and wanted to make another one. Mmmm, may be I should make one for my sister. She is as "crafty" as me and her work is so fine that every piece made is perfect. I will add her works into my blog to share with you all, and I hope she will grant me the permission to do so.
 Ouch, ouch, ouch!!! Hubby said that I am too heartless, poking needles into them, wouldn't I feel their pain? They are pincushion afterall!!! So, I decided to fully utilize them by poking more pins into them.... Ouch, ouch, ouch!!!


 The front.
 After sewing a centre piece surrounding by 6 hexagons, you will get a flower look of 6 petels. The one I made (as shown on the first photo) is slightly different where I have 2 centre pieces and that make it look elongated like an oval shape. That is going to be my secret project that I will tell you later. So, stay tuned!
 Frankly speaking, I don't have many friends from so long ago. This friendship with this birthday girl is 15 years old. I especially cherish this friendship now because we are so far apart. She is residing in Hong Kong and I am in Malaysia. By the way, we met in UK during our studies and on first sight, I knew that she is a kind hearted girl, so adorable and helpful.
 We have so many pleasant memories to share though we only lived together for a year, yeah living in the same hostel, don't get me wrong. She was extremely crazy about Kerokeropi, so much so that she had a collection of them. I gave her a KeroKeoPi T-shirt many years ago as her birthday gift, now, KeroKeropi purse and it is my handmade piece especially for her.
 I hope she will like it!!!!


 Cover it with a thin layer of organic soil, just enough to cover the seeds.
 Sprinke water until the soil gets wet thoroughly. You need to water it 3 times a day, morning, afternoon and night before bedtime.
 Sit back and enjoy a glass of healthy juice to rejuvenate the cells of your body!!!!


 Join fabric A & B by back-stitch A-B-A-B as shown, then complete it by stitching it to A again. Be careful on the bottom tip, just sew until the tip end, please don't go beyond that point.
 Clip curve near to the sticthing line (please don't cut the stitches) at the space of 1 cm as shown. This is neccessary to have a nice curvature at the corner of the purse.
  The wrong side should look like picture shown below.

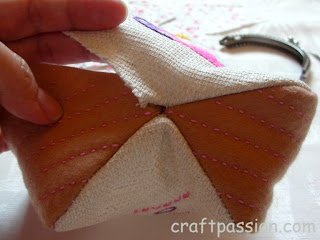
 Iron the joint seams.
 Again, the bottom of the 4-piece-joint should look like this.
 Now, we have finished both interior and exterior pieces.
 Turn the inter-lining (2) to the wrong side.
 Insert (1) into (2).
 Sew the upper portion by back-stitch.
 Reserve half of the border unstitched. We are going to use this unstitched portion to gain access to turn the purse inside-out.
 Pull out the exterior face from the unstitch gap.


