


Monkey Frame Clutch Purse - Tutorial
In my previous post, I showed you how to felt the monkey called Chi-Chai Monchan. This time, this tutorial is going to show you how to make the Monkey Frame Clutch purse that I made for my friend as a thank you gift. You don't need a sewing machine to do it, just your hand, a needle and thread!!!
Material:
1. Exterior fabric for A pattern, 2 pcs.
2. Exterior fabric for B pattern, 2 pcs.
3. Inter-lining fabric for A & B pattern, 2 pcs.each
4. Poly-sponge for A & B pattern, 2 pcs each
5. Iron-on interfacing for A & B pattern, 2 pcs. each
6. 8.5cm wide frame clutch (口金), 1 pc.
Finished product Dimension: Approx. 10.5cm W x 9.5cm H x 6.5cm D  Cut out the fabrics as per pattern shown above.
Iron on the interfacing by sandwiching the poly-sponge in between for pattern A & B respectively.Sew on Chi-Chai Monchan felt onto the right side of exterior fabric A (click here for the tutorial of making the Chi-Chai Monchan Felting). Embroider "Chi-Chai Monchan ♥ Bananas" onto another piece of fabric A.Tack stitching pink colour thread onto fabric B with about 2mm spacing for each stitch and 10mm width apart for each line.  Prepare the slip pocket. I sew on my label onto it :)
  Sew the slip pocket onto the inter-lining as shown.
  Join fabric A & B by back-stitch A-B-A-B as shown, then complete it by stitching it to A again. Be careful on the bottom tip, just sew until the tip end, please don't go beyond that point.
 This is the picture of how the bottom is supposed to look like before completing the joining.
 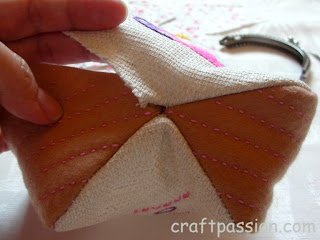 Clip curve near to the sticthing line (please don't cut the stitches) at the space of 1 cm as shown. This is neccessary to have a nice curvature at the corner of the purse.
  The wrong side should look like picture shown below.
 Flip it over and it should look like this.
 Repeat the above steps to the inter-lining.
  Iron the joint seams.
 Again, the bottom of the 4-piece-joint should look like this.
 Now, we have finished both interior and exterior pieces.
 Turn the inter-lining (2) to the wrong side.
 Insert (1) into (2).
 Sew the upper portion by back-stitch.
 Reserve half of the border unstitched. We are going to use this unstitched portion to gain access to turn the purse inside-out.
 Pull out the exterior face from the unstitch gap.
 Smooth out the inter-lining into the purse.Stitch up the unstitch portion to close the gap.

 Mark the centre line by water-erasable pen.
 Stitch the frame with back-stitch, begin from the centre line. I used 4 strands of nylon thread to reduce the chances of thread breakage.


7 comments:
WOW!!! Thanks for the tutorial...this is fantastic! :)
Hi mushroommeadows, hope you will try this out. I am making another one for my other friend but with different design. Hope that I can post up the photos soon.
Great tutorial! Very thorough and well photographed!
Thanks futuregirl, I took lots of pictures for every step I made. Those posted one are the best photographed and illustrated.
I could complete sewing a purse in a day or two, but with the photograph, it took me 4 days!!!
This is an amazing tutorial. Extremely well done and heck...what a cute purse!! I just love it!
absolutely adorable!
where do you purchase your kiss locks? i can never seem to find them.
Thanks!
Catty - I plan to set-up a store in ArtFire or Etsy. You can buy from me later. Please come back to check for the latest update. Thanks!
Post a Comment